This is the second article in the series,the whole thing starts here
And while the series is about building C systems with Rake there is a lot of preparation work to be done before we can actually run the first file through the compiler.
##Setting up the environment
Actually setting up the environment, installing the editor, the IDE, the compiler toolchain and making sure they are accessible from the terminal or the IDE etc. is a task most developers do not consciously consider. As a consequence we tend to underestimate the amount of work required to do it right and the actual cost of getting it wrong.
Oh, and this is dangerous ground. Editor wars, OS wars, the death-through-infrastructure syndrome and a zillion other reasons why it’s not going to work.
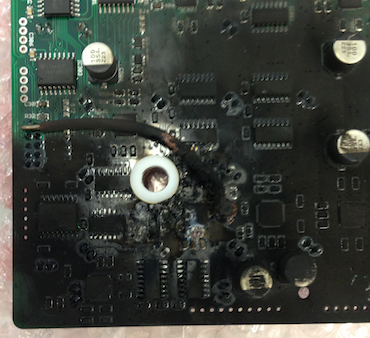
This is a very important step in every project, I can’t stress this enough. Consistency in the development environment is the single most important point when working with embedded software. Consider that apart from the usual software errors you have to deal with new, untested or flaky hardware. Just check the picture of a “smoke tested” board, cuplrit of a failed long running test.

And new electronics are ALWAYS a potential source of errors. Come to think of it, you can take ‘potential’ out of that sentence and it would still be true.
The difficulty of locating the cause for a bug increases exponentially with every source of errors. So we need as few error sources as possible. As a first step we establish a consistent development environment so that we can exclude differences between workstations as a culprit.
As a bonus, no developer can use ‘it works for me’ as a cop out when something breaks.
Take care not to misunderstand ‘consistent’ for ‘limited’. With provisioning tools like Chef, Puppet or Ansible there is very little reason why you can’t satisfy every developer’s wishes when it comes to editor, IDE or any other productivity tool.
And yes, all of this is also true on Windows. Painful, but true.
Practical matters
What we’re going to need is VirtualBox, vagrant, a CentOS basebox and optionally a git repository containing a bunch of Chef recipes.
With these ingredients in the end we will cook up a VM that will be our development environment with the RX63N board.
The CentOS choice is dictated by the fact that the KPIT toolchain comes packaged in RPM format. It also has to be the 32bit version, since KPIT does not come compiled for a x64 Linux flavour.
The base box proved to be problematic as http://www.vagrantbox.es/ lists only one recent CentOS box as 32bit but the base box is actually 64bit. Well, creating base boxes is easy. There’s blog posts about it.
Originally I wrote “there’s more interesting things to talk about”. But it seems that once more the combination of versions needed for the task requires some digging and further work. So, following the instructions on the provided link I proceeded to create a 32 bit CentOS 6.5 base box for vagrant. The set of instructions is up on GitHub
Hints & Tips for the decrepit mind
If you’re like me you’ll need to be reminded that on vagrant base boxes the root password is ‘vagrant’.
VM at hand
There are a few things to do that for convenience’s sake I will skip since this is a personal sandbox project.
There should be a project user (or depending on how far you want to take it, one account per team member). Things like repository access, SSH keys etc. need to be setup. For convenience everything will be done with the vagrant user.
Also, to keep software updates under control, there should be a chef/puppet/ansible installation and the contents of the VM should be managed as source. Since this is a one man team environment and there’s only really two software packages to install we will skip the overhead for now.
It should be noted though that between the time I started putting this environment together and now (which is about 5 months) there have been 4 new vagrant versions, a major CentOS update, 3 KPIT toolchain updates (one major version), a new Ruby version and uncountable gem updates. At the rate I’m writing I will be forced to add Chef recipes just to be able to keep the environment current.
In the next installment we’ll setup the toolchain and the RX63N board and figure out how to call everything from rake.